KVASER CANlib and Python Part 2: Tests and Samples

  • December 21, 2021
  • Logan Via

This is the second of two articles that introduce Kvaser CANlib and the Python CANlib Wrapper.

In this article, we will introduce some typical scenarios involving CAN, learn about different commands and functions while using CAN and gain a wider understanding of CAN, canlib and Kvaser Interfaces.

Writer: Anton Carlsson,  Software Developer

Cowriter: L-G Fredriksson, Field Application Engineer

Version: 2021-08-09A

Who should read this?

This guide has been written for those who want to set up and use a Kvaser CAN interface with CANlib and the Python CANlib package/wrapper.

To use this guide, the user needs to be somewhat familiar with (or able to look up) the following:

  • Some knowledge about the operating system that will be used. More knowledge is needed when using Linux rather than Windows.
  • How to open and use the basic commands in a command-line application, such as the Command Prompt or Windows PowerShell.
  • Knowledge of how programming works is not necessary but will help. Additionally, any experience with Python will greatly simplify the process.

Prepare Python for CANlib

Please read the paper: Kvaser CANlib & Python Part 1, Initial setup

Please note: Some of the samples are written for three interfaces.


Quick start procedure, reminder

If you have taken a break or just forgotten the used commands/procedure, please use this little list of powerful commands and instructions.

  • Start Windows Powershell:  
    powershell.exe
  • Move to desired directory where you have your Python script: cd (if you already have a virtual environment and permission to run it, skip the next two steps)
  • Create a virtual environment: 
    py -3 -m venv .venv --prompt.
  • If you are using a new computer or a new user without permission:
    Set-ExecutionPolicy Unrestricted -Scope CurrentUser
  • Activate the virtual environment: 
    .\.venv\Scripts\activate
  • If you have not already installed canlib in this virtual environment do so:
    pip install canlib
  • Run script: py check_ch.py”(check_ch.py is always good to run once to make sure the wanted interfaces are connected)
  • Start editor:
    python -m idlelib
    python -m idlelib check_ch.py
  • Deactivate the virtual environment: 
    deactivate

Send a CAN message

(This information is a copy from the paper:Kvaser CANlib & Python Part 1, First setup)

Simple approach

To send a basic CAN message, create a script named send_msg.py containing the following code (make sure that the script is located within the same folder as the virtual environment):

#send_msg
#The CANlib library is initialized when the canlib module is imported. To be
# able to send a message, Frame also needs to be installed.
from canlib import canlib, Frame

# Firstly, open two CAN channels, one to send the message and one to receive.
# Note that there needs to be a channel to receive, as otherwise the message
# can not be sent. In this example the channels are named ch_a and ch_b. To
# open the channels call on the openChannel method inside of canlib and, as an
# input put in channel=0 and channel=1. Where 0 and 1 represents the two
# CANlib channels 0 and 1.
ch_a = canlib.openChannel(channel=0)
ch_b = canlib.openChannel(channel=1)

# After opening the channel, we need to set the bus parameters. Some
# interfaces keep their params from previous programs. This can cause problems
# if the params are different between the interfaces/channels. For now we will
# use setBusParams() to set the canBitrate to 250K.
ch_0.setBusParams(canlib.canBITRATE_250K)
ch_1.setBusParams(canlib.canBITRATE_250K)

# The next step is to Activate the CAN chip for each channel (ch_a and ch_b in
# this example) use .busOn() to make them ready to receive and send messages.
ch_a.busOn()
ch_b.busOn()

# To transmit a message with (11-bit) CAN id = 123 and contents (decimal) 72, 
# 69, 76, 76, 79, 33, first create the CANFrame (CANmessage) and name it. In
# this example, the CANFrame is named frame. Then send the message by calling on
# the channel that will act as the sender and use .write() with the CANFrame
# as input. In this example ch_a will act as sender.
frame = Frame(id_=123, data=[72, 69, 76, 76, 79, 33])
ch_a.write(frame)

# To make sure the message was sent we will attempt to read the message. Using
# timeout, only 500 ms will be spent waiting to receive the CANFrame. If it takes
# longer the program will encounter a timeout error. read the CANFrame by calling
# .read() on the channel that receives the message, ch_b in this example. To
# then read the message we will use print() and send msg as the input.
msg = ch_b.read(timeout=500)
print(msg)

# After the message has been sent, received and read it is time to inactivate
# the CAN chip. To do this call .busOff() on both channels that went .busOn()
ch_a.busOff()
ch_b.busOff()

# Lastly, close all channels with close() to finish up.
ch_a.close()
ch_b.close()

# Depending on the situation it is not always necessary or preferable to go of
# the bus with the channels and, instead only use close(). But this will be
# talked more about later.

To run the previous program, activate your virtual environment and run the script using powershell. Running the program will result in something like the following:

> .\.venv\Scripts\activate
(pyproj)> py send_msg.py
Frame(id=123, data=bytearray(b'HELLO!'), dlc=6, flags=<MessageFlag.STD: 2>, timestamp=9)

Simple approach using virtual interfaces

If we want to use the virtual interface and the virtual channels, we need to change the openchannel commands. Firstly we need to change the numbers from 0 and 1 to 2 and 3 to represent the virtual channels. Then we need to add a flag (another input) that says ACCEPT_VIRTUAL to define that a virtual channel will be used and accepted. The command will now look like:

	canlib.openChannel(channel=2, flags=canlib.open.ACCEPT_VIRTUAL)

If we do not add the ACCEPT_VIRTUAL flag we will receive a Specified device not found (-3). It is also important to note that a virtual channel can only communicate with another virtual channel.

A more Pythonic way

The code used in send a CAN message is a very standard and straightforward way to write the script we want. Using Python however we can write the code in a more “Pythonic way”. This will lead to the following script names send_msg_pyt.py:

# send_msg_pyt
from canlib import canlib, Frame

# instead of opening the two channels and closing them one by one, we will use a
# with statement. Using the with statement to open one or more channels with
# canlib.openChannel(i) as ch_x. Within this with statement we will write the
# rest of the code.
with canlib.openChannel(2) as ch_a, canlib.openChannel(3) as ch_b:

# Instead of going on bus with "copy-paste" for each channel, we will use a
# for-loop. Within this loop we will go through a list of all channels opened
# using the with statement. Currently we only have two channels, which makes
# the for-loop somewhat unnecessary. However, when we start using more
# channels the for-loop will be preferred.
    for ch in [ch_a, ch_b]:
        ch.busOn()

    frame = Frame(id_=123, data=[72, 69, 76, 76, 79, 33])
    ch_a.write(frame)

    msg = ch_b.read(timeout=500)
    print(msg)

# After we run out of code within the with statement and exit it, we don’t
# need to manually close it or go off bus. The channels that were open using
# the with statement will be automatically closed, and with the channels being
# closed they also went off the bus.

Wait

While writing several messages, we might want to confirm that they were received properly. To do this we will make use of the command writeWait(). writeWait does the same as write when it comes to sending a message, but it also gives a timeout limit for how long it will wait for the message to be sent. The command may look like writeWait(frame, timeout=500), this will send a message with the details given by frame and wait 500 milliseconds for it to be sent before returning an error message Timeout occurred (-7). WriteWait can be used when sending one or multiple messages. When sending several messages we can use writeWait on every message, but this will take time to execute and is not very efficient. Instead we can use write on all messages, apart from the last one which will be writeWait. If one message fails to be sent properly, all after will fail and the timeout error Timeout occured (-7) will be raised by writeWait.

To test writeWait, we will make two scripts called send_msg_wait.py and send_msgs_wait.py which will be based on the send message code but with some changes. The first script send_msg_wait.py will send a message using writeWait to send one successful message and one unsuccessful message:

# send_msg_wait
from canlib import canlib, Frame

# We will now open three channels, two from the USBcan and one on
# the leaf pro which we will not connect to the T-cannector. We will use the
# leaf pro channel ch_c to send errorframes.
with canlib.openChannel(2) as ch_a, canlib.openChannel(3) as ch_b, canlib.openChannel(4) as ch_c:
    for ch in [ch_a, ch_b, ch_c]:
        ch.busOn()

    frame = Frame(id_=123, data=[72, 69, 76, 76, 79, 33])
    
# Instead of using write we will now use writeWait(). We will attempt to send
# a message for 500 milliseconds, if the message is not sent we will receive a
# Timeout occured error.
    ch_a.writeWait(frame, timeout=500)

# We will now try to send a message with the channel not connected to the
# T-cannector. This should result in a Timeout occurred error.
    ch_c.writeWait(frame, timeout=500)

    msg = ch_b.read(timeout=500)
    print(msg)

In the next script send_msgs_wait-py we will send multiple messages and using waitWrite to make sure that the messages were sent:

# send_msgs_wait
from canlib import canlib, Frame

# We will now open three channels, two from the USBcan and one on the
# leaf pro which we will not connect to the T-cannector. We will use the
# leaf pro channel ch_c to send errorframes.
with canlib.openChannel(2) as ch_a, canlib.openChannel(3) as ch_b, canlib.openChannel(4) as ch_c:
    for ch in [ch_a, ch_b, ch_c]:
        ch.busOn()

    frame = Frame(id_=123, data=[72, 69, 76, 76, 79, 33])
    
# We will now send 199 messages in a for-loop and after the loop use writeWait
# to send a last message, to make sure all previous messages were sent.
    for i in range(199):
        ch_a.write(frame)
    ch_a.writeWait(frame, timeout=500)

    msg = ch_b.read(timeout=500)
    print(msg)

# We will now do the same with the ch_c channel not connected to the
# T-cannector. This should result in a timeout error.
    for i in range(199):
        ch_c.write(frame)
    ch_c.writeWait(frame, timeout=100)

    msg = ch_b.read(timeout=500)
    print(msg)

Required hardware

For part two of this guide we will need at least three channels, so if the device we used for Part One does not have three channels, we need another device. In this guide a Kvaser Leaf Pro HS v2 will be used, in addition to the Kvaser USBcan Pro 2xHS v2.


Silent mode

While receiving messages with CANlib using the CAN channels that are onbus (channels that have gone on bus with busOn), there are two possible modes to choose from. The two modes are Normal and Silent mode and are called bus modes. To set the bus driver mode use “Channel.setBusOutputControl”. 

Normal mode

Normal mode is the default mode for Kvaser interfaces and can be manually set to “canlib.canlib.Driver.NORMAL” using setBusOutputControl. Normal mode means that the driver is a standard push-pull, which means that it can both send (push) and receive (pull) messages on the bus.

Silent mode

Silent mode is supported by some controllers and can be set to “canlib.canlib.driver.SILENT” using setBusOutputControl. While in silent mode, the driver will be set to receive only. This means that the controller will not transmit anything on the bus, not even ack (acknowledgement) bits. This can be useful when listening to a CAN bus without wanting to interfere in any way. The silent channel can still be used when calling .write, but the message will not be sent properly. Instead the messages will go into the “transmit queue” without being sent. This will become apparent when there are too many messages in the transmit queue and we get a Transmit buffer overflow error.

Note that not all devices support silent mode. However when we try to set a device that does not support silent mode, we will not receive any indication that the device did not change its mode. Instead, the device will send messages and act like a device on normal mode. This can be a problem if we switch around the devices, without changing their channels. Therefore, before setting a channel to silent mode we want to make sure that the channel/device supports silent mode. There are two ways of doing this. Either we can get the user guide from the Kvaser website, go to Technical data and look in the table to see if it is supported or not, or more preferable, use channel_data. To get the capabilities of the channel, use channel_data.channel_cap. Then create an if statement to see if ChannelCap.SILENT_MODE (silent mode) is included in channel_data.channel_cap.

Example

To show how silent mode is used we will reuse the example for sending a CAN message and add to it. The comments used previously have been removed and new comments have been added for the new code. 

The first example shows that the silent channel does not interfere with a sent message from another channel. Use the following code in a script:

# silent_mode
from canlib import canlib, Frame

ch_a = canlib.openChannel(channel=0)
ch_b = canlib.openChannel(channel=1)

# Using the setBusOutputControl method we set ch_a (channel 0) to normal. This 
# line is not necessary, as normal is the default mode, but for the sake of
# clarity we will add it anyway. Then we do the same to the channel ch_b
# (channel 1) but set it to silent.
ch_a.setBusOutputControl(canlib.Driver.NORMAL)
# before setting the second channel, we need to make sure that the channel
# actually supports silent mode. For this we will use an if statement.
if canlib.ChannelCap.SILENT_MODE in ch_b.channel_data.channel_cap:
ch_b.setBusOutputControl(canlib.Driver.SILENT)
# If the channel does not support silent mode we will exit the program.
else:
exit()
# The rest of the code will remain unchanged.
ch_a.busOn()
ch_b.busOn()

frame = Frame(id_=123, data=[72, 69, 76, 76, 79, 33])
ch_a.write(frame)

msg = ch_b.read(timeout=500)
print(msg)

ch_a.busOff()
ch_b.busOff()

ch_a.close()
ch_b.close()

Running this silent_mode script results in the following error frame (CAN error message):

(pyproj)> py silent_mode.py
Frame(id=0, data=bytearray(b''), dlc=0, flags=<MessageFlag.ERROR_FRAME: 32>, timestamp=15)

The message (frame) is sent by the channel ch_a but during the message send, it is turned into an error message (error frame). This meant that no other channel received the message and therefore the acknowledgement bit was not added. This shows that even though the channel ch_b read the message, it did not add an acknowledgement bit, which proves that a silent channel will not interfere with any traffic that is sent on the bus.

The next test is to send a message with a silent channel and observe the CAN interface. This time we will not write a script but instead use the python interpreter. To launch the python interpreter and send a message, type the following into powershell: 

> .\.venv\Scripts\activate
(pyproj) PS C:\Users\extac\Pyproj> py
Python 3.9.5 (tags/v3.9.5:0a7dcbd, May  3 2021, 17:27:52) [MSC v.1928 64 bit (AMD64)] on win32
Type "help", "copyright", "credits" or "license" for more information.
>>> from canlib import canlib, Frame
>>> ch = canlib.openChannel(channel=1)
>>> ch.setBusOutputControl(canlib.Driver.SILENT)
>>> ch.busOn()
>>> frame = Frame(id_=123, data=[72, 69, 76, 76, 79, 33])
>>> ch.write(frame)

This will not result in any errors in the python interpreter, but if we look at the Kvaser CAN interface, the channel led will flash red indicating an error (see the picture below, which led that flashes depends on which channel encountered the error). When we are finished looking at the flashing light, go off the bus and close it with the following:

>>> ch.busOff()
>>> ch.close()
led1

A Kvaser CAN interface connected to a computer (indicated by the green light for PWR) receiving an error on its second channel (indicated by the red light flashing on CAN 2).

To receive an error within the interpreter we need to send more messages at once. To do this we will surround the write() command with a for-loop (still using the Python interpreter within powershell):

> .\.venv\Scripts\activate
(pyproj) PS C:\Users\extac\Pyproj> py
Python 3.9.5 (tags/v3.9.5:0a7dcbd, May  3 2021, 17:27:52) [MSC v.1928 64 bit (AMD64)] on win32
Type "help", "copyright", "credits" or "license" for more information.
>>> from canlib import canlib, Frame
>>> ch = canlib.openChannel(channel=1)
>>> ch.setBusOutputControl(canlib.Driver.SILENT)
>>> ch.busOn()
>>> frame = Frame(id_=123, data=[72, 69, 76, 76, 79, 33])
>>> for i in range(2000):
...     ch.write(frame)
Traceback (most recent call last):
  File "<stdin>", line 2, in <module>
  File "C:\Users\extac\Pyproj\.venv\lib\site-packages\canlib\canlib\channel.py", line 718, in write
    dll.canWrite(self.handle, frame.id, bytes(frame.data), frame.dlc, frame.flags)
  File "C:\Users\extac\Pyproj\.venv\lib\site-packages\canlib\canlib\dll.py", line 177, in _error_check
    raise can_error(result)
canlib.canlib.exceptions.CanGeneralError: Transmit buffer overflow (-13)

Once again, remember to go off the bus and close the channel when finished.

>>> ch.busOff()
>>> ch.close()

For the next example we need to add a third channel to be able to send a message as well as reading it with a silent channel. Note that to be able to have a silent channel, there must be at least two other channels that can send and receive the message normally. In this guide we will add a Kvaser Leaf Pro HS v2, but any other CAN interface with at least one channel will do. To see that more than two channels are available, run the script check_ch once more, which for this example results in:

	(pyproj)> py check_ch.py
	Found 5 channels
	0. Kvaser USBcan Pro 2xHS v2 (channel 0) (00752-9:13406/0)
	1. Kvaser USBcan Pro 2xHS v2 (channel 1) (00752-9:13406/1)
	2. Kvaser Leaf Pro HS v2 (channel 0) (00843-4:10012/0)
	3. Kvaser Virtual CAN Driver (channel 0) (00000-0:0/0)
	4. Kvaser Virtual CAN Driver (channel 1) (00000-0:0/1)

Compared to the previous time we ran check_ch, the virtual channels have dropped down from 2 and 3 to 3 and 4. The CAN channel 2 has been taken over by the new Kvaser Leaf Pro CAN interface that was added.

The next step is to send a message with two normal channels and listen with a third silent channel. Once again we will go back to the CAN message example and add code, this script will be called silent_listen:

# silent_listen
from canlib import canlib, Frame

# Open a third channel (channel 2) and name it ch_c.
ch_a = canlib.openChannel(channel=0)
ch_b = canlib.openChannel(channel=1)
ch_c = canlib.openChannel(channel=2)

# Set ch_a and ch_b to normal, again unnecessary but to clarify,
ch_a.setBusOutputControl(canlib.Driver.NORMAL)
ch_b.setBusOutputControl(canlib.Driver.NORMAL)
# and ch_c to silent.
if canlib.ChannelCap.SILENT_MODE in ch_c.channel_data.channel_cap:
ch_c.setBusOutputControl(canlib.Driver.SILENT)
else:
    exit()

# Put the third channel ch_c on the bus.
ch_a.busOn()
ch_b.busOn()
ch_c.busOn()

frame = Frame(id_=123, data=[72, 69, 76, 76, 79, 33])
ch_a.write(frame)

# Add ch_c to read the message as the silent channel to read the message.
msg_c = ch_c.read(timeout=500)
msg_b = ch_b.read(timeout=500)

# Print both messages to compare them.
print("msg c:”)
print(msg_c)
print("msg b:”)
print(msg_b)

# Go off bus with all three channels.
ch_a.busOff()
ch_b.busOff()
ch_c.busOff()

# Lastly, close all channels.
ch_a.close()
ch_b.close()
ch_c.close()

Running the script in powershell will result in the following:

(pyproj)> py silent_listen.py
msg c:
Frame(id=123, data=bytearray(b'HELLO!'), dlc=6, flags=<MessageFlag.STD: 2>, timestamp=2)
msg b:
Frame(id=123, data=bytearray(b'HELLO!'), dlc=6, flags=<MessageFlag.STD: 2>, timestamp=5)

We can now see that the silent channel ch_c can read the message, and with ch_b also reading the message it no longer becomes an error message. In this example the silent channel is not necessary but it is still an example on how we can use it.


Setting bus parameters

There are multiple ways to set bus parameters that can be set on the bus. In this guide we will only focus on setting, checking and changing the CAN Bitrate of the channels using predefined bus parameters, for a list of all predefined parameters go to pycanlib.readthedocs canlib.canlib.Bitrate. To set the bitrate use setBusParams() and canlib.Bitrate.BITRATE_xK as the input, where x is the bitrate wanted. Before setting the bitrate we will use getBusParams() before to get the standard parameters and after to see that the parameters have changed.

Note that both the transmitting and receiving channel must use the same bitrate. Otherwise we will receive an error message and the red light will start to flash. In the following example script we will use the send message example, add the setBusParams function and call it change_bitrate.

# change_bitrate
from canlib import canlib, Frame

ch_a = canlib.openChannel(channel=0)
ch_b = canlib.openChannel(channel=1)

# Use getBusParams and print the result to see the preset parameters on both
# channels.
print(ch_a.getBusParams())
print(ch_b.getBusParams())

# After opening both channels we will call upon the setBusParams to change the
# bitrate of the message. From the list of predefined we will use BITRATE_100K
ch_a.setBusParams(canlib.Bitrate.BITRATE_100K)
ch_b.setBusParams(canlib.Bitrate.BITRATE_100K)

# Use getBusParams and print the result to see that the parameters changed on
# both channels.
print(ch_a.getBusParams())
print(ch_b.getBusParams())

ch_a.busOn()
ch_b.busOn()

frame = Frame(id_=123, data=[72, 69, 76, 76, 79, 33])
ch_a.write(frame)

msg = ch_b.read(timeout=500)
print(msg)

ch_a.busOff()
ch_b.busOff()

ch_a.close()
ch_b.close()

Launching this script within the virtual environment will result in the following:

	> .\.venv\Scripts\activate
	(pyproj)> py change_bitrate.py
	(500000, 4, 3, 1, 1, 1)
	(500000, 4, 3, 1, 1, 1)
	(100000, 11, 4, 1, 3, 1)
	(100000, 11, 4, 1, 3, 1)
	Frame(id=123, data=bytearray(b'HELLO!'), dlc=6, flags=<MessageFlag.STD: 2>, timestamp=3)

We can now clearly see that both channels have the same preset parameters before changing and then after the change they still have the same parameters. Normally the bitrate is not changed, so as a shortcut the bitrate can be set whilst calling openChannel as seen here:

ch_a = canlib.openChannel(channel=2, bitrate=canlib.Bitrate.BITRATE_100K)

LEDs

All Kvaser interfaces have LEDs that are used to indicate when the interface is working or having errors. We can test these LEDs with flashLeds and different actions and LEDs. The actions include turning all LeDs on and off or turning all LEDs on or off. For a full list of available actions go to pycanlib.readthedocs canlib.canlic.LEDAction. Note that not all actions will work on all Kvaser interfaces since the interfaces have different numbers of LEDs and channels. We will use a Kvaser USBcan pro 2xHS v2 to test flashLeds with a python interpreter running the following commands (make sure to look at the CAN interface when executing the flashLed commands to see the LEDs):

	> .\.venv\Scripts\activate
	(pyproj)> py
	Python 3.9.5 (tags/v3.9.5:0a7dcbd, May  3 2021, 17:27:52) [MSC v.1928 64 bit (AMD64)] on win32
	Type "help", "copyright", "credits" or "license" for more information.
	>>> from canlib import canlib
	>>> ch = canlib.openChannel(channel=0)
	>>> ch.flashleds(canlib.LEDAction.ALL_LEDS_ON, 10000)
	>>> ch.flashleds(canlib.LEDAction.ALL_LEDS_OFF, 10000)

In the previous code we executed the actions 0 and 1. The action 0 turns on all LEDs while action 1 turns off all LEDs. How long the LEDs “flash” depends on the second integer. In this example we have 10000 which represents 10000 ms which is 10 seconds. This gives us enough time to clearly see that the LEDs function correctly. 

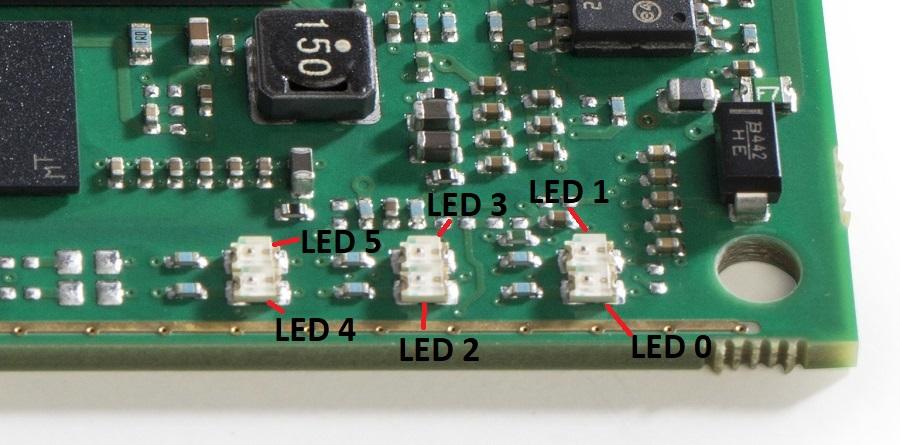
Next we will turn on one LED at a time. Doing this we will show that each “hole” for the LEDs has two LEDs with different colours. In the picture below we can see the different LEDs (the ones in white) as they look on the circuit board inside the cover.

led2

The inside of a Kvaser CAN interface where we can see the six LEDs on this particular interface that has two channels (two LED pair’s per channel and two PWR LEDs). The designated number for each LED is shown in the picture.

In this example we will turn on LED 0 and 3 which are the two LEDs for CAN 1, these two LEDs are the LED 2 and 3, with the colours red and yellow respectively. Use the following code in the python interpreter:

	>>> ch.flashLeds(canlib.LEDAction.LED_2_ON, 10000)
	>>> ch.flashLeds(canlib.LEDAction.LED_3_ON, 10000)

If we instead were to use the LEDs for the PWR the colours would be green and yellow (LED_0_ON and LED_1_ON respectively).


Finding device

Within canlib there is a class called “Device” that can be used to find and keep track of a physical device. The device class represents a physical device regardless of whether it is currently connected or not, and on which channel it is connected. If the device is connected, use Device.find to find a device and get a device object. To search for the device both EAN and the serial number can be used. Open the virtual environment, start the python interpreter and run the following:

	> .\.venv\Scripts\activate
	(pyproj)> py
	>>> from canlib import Device, EAN
	>>> Device.find(ean=EAN('73-30130-00752-9'))
	Device(ean=<EAN: 73-30130-00752-9>, serial=13406)
	>>> Device.find(serial=13406)
	Device(ean=<EAN: 73-30130-00752-9>, serial=13406)

Device.find will search for, and return the first device that matches the input arguments. In the previous example we searched for the first device with an EAN of 73-30130-00752-9 and the serial number 13406.

If the wanted device is not currently connected, a device object can be created with their EAN and serial number (the minimal information needed to uniquely identify a specific device). With the EAN number only the last six numbers are necessary, since the first seven are default and the same on all interfaces. To create a device run the following code in the python interpreter:

	>>> dev = Device(ean=EAN('67890-1'), serial=42)

After the new device has been created and connected to the PC via a USB we can get its (or any other devices) information with probe_info:

	>>> print(dev.probe_info())
	CANlib Channel: 2
	Card Number   : 0
	Device        : Kvaser USBcan Pro 2xHS v2 (channel 0)
	Driver Name   : kcany0a
	EAN           : 73-30130-00752-9
	Firmware      : 3.25.0.753
	Serial Number : 13406

Device.find can also be used to open a channel on a specific connected interface irregardless of on which CANlib channel number it was assigned. To do this call on Device.find and then open_channel. This will automatically open the first local channel on the interface:

	>>> dev = Device.find(ean=EAN(‘00752-9’))
	>>> ch = dev.open_channel()

Ch can now be used the same way as any other channel opened with canlib.openChannel(channel=x).

When opening the channel we can simultaneously specify which channel on the interface to use. This is done with chan_no_on_card, which specifies the local channel on the interface. Make sure that the chan_no_on_card integer is less than the number of CANs on the interface (if there are two channels the integer should be 0 or 1).

	>>> ch = dev.open_channel(chan_no_on_card=1)

And the last step is to set the bitrate at the same time as opening the channel.

	>>> ch = dev.open_channel(chan_no_on_card=1, bitrate=canlib.Bitrate.BITRATE_100K)

Channel and handle data

Probe_info can be used on a device object to get information about a connected interface. Probe_info uses the ChannelData function which we can use directly, such as we did in the check_ch script. Along with ChannelData we can also use two more ways of getting information about a device or interface.

The first way we can use to get the channel data is to use canlib.ChannelData(x) where x is the channel we want data about. To run this command we need to start the virtual environment and the python interpreter before starting the ChannelData. In this example we will get the data from channel 0:

	> .\.venv\Scripts\activate
	(pyproj)> py
	Python 3.9.5 (tags/v3.9.5:0a7dcbd, May  3 2021, 17:27:52) [MSC v.1928 64 bit (AMD64)] on win32
	Type "help", "copyright", "credits" or "license" for more information.
	>>> from canlib import canlib
	>>> dat = canlib.ChannelData(0)

After the data object has been created and named dat, we can use that to get any information we want from channeldata. For a full list of available data go to pycanlib readthedocs canlib.canlib.ChannelData.

Using canlib.ChannelData however requires that we know which channel the interface is connected to. This can become problematic since when removing and inserting interfaces they will most likely change channel numbers. So if we do not know the channel we can not use ChannelData. Instead there are two other ways to get the data object. One way is to find or create a device named dev and using dev.channel_dev(), and the other is opening a channel and using ch.channel_data(). Both ways use the Python interpreter:

	>>> dev = Device.find(ean=EAN(‘00752-9’))
	>>> dat = dev.channel_data()

	>>> ch = canlib.openChannel(channel=0) 
	>>> dat = ch.channel_data()

Out of these two options dev.channel is always right and easiest to use. Getting dat through openChannel has the same result as the script check_ch.py script used earlier.


Enumerate

Once we have imported canlib.canlib, which enumerates the connected Kvaser CAN devices, we can call getNumberOfChannels to get the number of enumerated channels in our system. If we are connecting and disconnecting interfaces simultaneously while running programs, a problem can arise. Inside of the program we use the channels when referring to CAN channels and interfaces. But if we add or remove  any of the interfaces whilst the program is running, the changes won’t affect the program. Or alternatively the wrong interface will be used when referencing a certain channel. Note that the following is only necessary if devices are continuously being connected and disconnected while the code is running.

To fix this problem we will manually enumerate the available CAN channels. The function is canlib.enumerate_hardware and is used to create a completely new set of CANlib channel numbers based on all currently connected devices. The currently opened channel handles are still valid and usable. However, with using this function we need to stop referring to devices based on CANlib channel number, and instead use the channel class. Since the number will change every time enumerate_hardware is called. Instead to retrieve information about a specific channel. Use Channel.channel_data.

Adding a device

If we connect a device while a program is being run, the program will simply not recognise that a new device was connected. We can see this by using canlib.getNumberOfChannels inside of the virtual environment and the python interpreter (in this example we have a USBcan connected and will connect a leaflight):

	> .\.venv\Scripts\activate
	(pyproj)> py
	Python 3.9.5 (tags/v3.9.5:0a7dcbd, May  3 2021, 17:27:52) [MSC v.1928 64 bit (AMD64)] on win32
	Type "help", "copyright", "credits" or "license" for more information.
	>>> from canlib import canlib
	>>> canlib.getNumberOfChannels()
	4

Next connect the leaflight and run the getNumberOfChannels again:

	>>> canlib.getNumberOfChannels()
	4

If we now manually run enumerate_hardware and then run getNumberOfChannels we get:

	>>> canlib.enumerate_hardware
	5
	>>> canlib.getNumberOfChannels()
	5

We can now see that without restarting the program, the new channel was recognised and can now be used.

Removing a device

If we remove a device we will encounter some issues. Firstly, as when connecting a device, the program will not recognise that a device was removed with getNumberOfChannels until the connected devices have been re-enumerated (enumerate has been run):

	>>> canlib.getNumberOfChannels()
	5
	>>> canlib.enumerate_hardware
	4
	>>> canlib.getNumberOfChannels()
	4

If a channel was opened to the device before the device was removed, the program will still attempt to interact with the device using the commands run by the program. Running most of these commands will result in an error, however there are a couple of commands that will still work. To show this we will now attempt to write and read with an interface we remove after opening the channels. Before running both the read and write command the setup code needs to be run in the Python interpreter:

	>>> from canlib import canlib, Frame
	>>> ch_a = canlib.openChannel(0)
	>>> ch_a.busOn()
	>>> ch_b = canlib.openChannel(1)
	>>> ch_b.busOn()
	>>> frame = Frame(id_=123, data=[72, 69, 76, 76, 79, 33])

If we now disconnect the CAN interface and attempt to write a frame with one of the removed channels, we will get a hardware error exception:

	>>> ch_a.write(frame)
	Traceback (most recent call last):
	  File "<stdin>", line 1, in <module>
	  File "C:\Users\extac\Pyproj\.venv\lib\site-packages\canlib\canlib\channel.py", line 718, in write
	    dll.canWrite(self.handle, frame.id, bytes(frame.data), frame.dlc, frame.flags)
	  File "C:\Users\extac\Pyproj\.venv\lib\site-packages\canlib\canlib\dll.py", line 177, in _error_check
	    raise can_error(result)
	canlib.canlib.exceptions.CanGeneralError: A hardware error was detected (-15)

To attempt to read a message with a removed channel we need to run the setup code once more before removing the interface and running the read code.

	>>> ch_a.read()
	Traceback (most recent call last):
	  File "<stdin>", line 1, in <module>
	  File "C:\Users\extac\Pyproj\.venv\lib\site-packages\canlib\canlib\channel.py", line 718, in write
	    dll.canWrite(self.handle, frame.id, bytes(frame.data), frame.dlc, frame.flags)
	  File "C:\Users\extac\Pyproj\.venv\lib\site-packages\canlib\canlib\dll.py", line 177, in _error_check
	    raise can_error(result)
	canlib.canlib.exceptions.CanGeneralError: A hardware error was detected (-15)

När man stoppar i ny enhet syns den inte om man redan startatt programmet

Istället för att starta om, använd enumerate

Visa att Canlib channel number “hoppar” men ch fungerar fortfarande.


Custom channel name

When we are using several interfaces with several channels it may become difficult to remember which channel is which. To help with this problem we can rename channels and give them a custom name. To give the channels the custom name we need to use the Kvaser Device Guide. Inside of the Kvaser Device Guide right-click the channel we want to apply the custom name to, and click Edit Channel Name. A window will pop up where the channel name can be imputed, to apply the name click the “ok” button. To remove the name, simply open the change channel name window again and remove the inserted name. Note that the change will affect all programs that use the channel name to identify a device. The device will also reboot to set the name.

The next step is to get the custom name and use it via Python. To get the name use canlib.getChannelData().custom_name. We will now create a script called get_cus_name.py to get the custom name from all connected devices. Within the script write the following code:

# get_cus_name.py
from canlib import canlib

num_channels = canlib.getNumberOfChannels()
for ch in range(num_channels):
    chd = canlib.ChannelData(ch)
    print(f"{ch}. {chd.channel_name}, Custom name: {chd.custom_name}")

Which will result in the following if a Kvaser CANusb is installed with channel 0 having the custom name “Green” and channel 1 the custom name “Red”:

0. Kvaser USBcan Pro 2xHS v2 (channel 0), Custom name: Green
1. Kvaser USBcan Pro 2xHS v2 (channel 1), Custom name: Red
2. Kvaser Virtual CAN Driver (channel 0), Custom name:
3. Kvaser Virtual CAN Driver (channel 1), Custom name:

We can also use the custom name to open a specific channel. To do this write the following script called open_channel_by_name, which will include the function of the same name and a test to make sure it works properly. Within this test we have a kvaser USBcan with the custom name USBone and a leaflight with the custom name My leaf. Within the script write the following code:

#open__channel_by_name
from canlib import canlib, Frame


# The function we will use to open a channel using the custom channel name.
# The custom name will be sent in as an input.
def open_channel_by_name(cust_name):
# Firstly, using a for-loop will be used to go through every connected device.
    num_channels = canlib.getNumberOfChannels()
    for i in range(num_channels):
        chd = canlib.ChannelData(i)
# For every device connected their custom name is compared to the input name.
# If the names are the same, the channel is opened and named ch.
        if cust_name == chd.custom_name:
            ch = canlib.openChannel(i)
            break
# If we do not find a channel with the input name as a custom name, the
# following message is shown and the exception CanNotFound is raised.
    else:
        print(f"Channel with custom name {cust_name} not found”)
        raise canlib.CanNotFound
# The opened channel named ch is returned by the function.
    return ch

# We will now test the function by opening two channels using their custom
# name and sending a message between them. THe channels we will try to open is
# the first channel on a USBcan with the custom name USBone and the channel on
# a leaflight with the name My Leaf. The channels will be named ch_b and ch_a
# respectively.
ch_b = open_channel_by_name("My Leaf”)
ch_a = open_channel_by_name(“USBone")
ch_a.busOn()
ch_b.busOn()
frame = Frame(id_=123, data=[72, 69, 76, 76, 79, 33])
ch_a.write(frame)
msg = ch_b.read()
print(msg)
ch_a.close()
ch_b.close()
# After successfully sending a message we will see what happens when we try to
# open a channel with a custom name that does not exist.
ch_a = open_channel_by_name("USBoe")

Troubleshooting, basic errors

While working with Python canlib and CAN interfaces, there are multiple errors and problems we can be faced with. We will now go through a couple of common error messages and problems:

  • Blinking red light: A fast blinking red CAN light indicates that several errorframe has been received, which means that a problem could have occurred while the message was being transmitted. Three possible problems may be that:
    1. Only one channel connected to the CAN bus (connected to the T-cannector).
    2. Only one channel is bus on (the channel has gone busOn()).
    3. The receiving or transmitting bus was in silent mode. 

    To fix this, firstly go offbus with the channel that received the error to stop the blinking red light. Then make sure there are at least two channels connected to the T-cannector and on bus in normal mode, one to send the message and one to receive it.

  • No messages available (-2): An error that occurs when we call on read() without a message being sent or being sent incorrectly, for example having the wrong bitrate. This may have been caused by write() not being called or the transmitting channel being on silent mode, which would cause the message to not be sent. To fix this problem make sure that write() was called correctly with a frame and that the transmitting channel is on normal mode and using the same bitrate as the receiving channel.
  • Transmit buffer overflow (-13): When we try to send a lot of messages that all fail, they will be “queued” in the transmit buffer. This will cause all later messages to also fail despite being done correctly, if the channel is on bus the LED will start blinking red. This can be caused by sending a lot of messages using a silent device or sending messages with a device that is not onbus. If the channel was onbus but silent, the red light will start blinking. To fix this problem start with going off- and onbus to clear the transmit buffer (the device can also be disconnected and reconnected to the computer). If this doesn’t fix the problem, make sure all busses are onbus. Either using .busOn() or by checking if the interface is connected to the T-Cannector.
  • A hardware error was detected (-15): If we try to interact with a device that is not connected we will receive this error. Most likely the device was not connected with the USB, removed after starting the program or a line of code somewhere called on the wrong device. To fix this, dubble check that all devices are connected with the USB and if this does not work dubble check all code used to identify a device.
  • Timeout occurred (-7): Timeout is an error raised when  we as the user give a timeout limit for how long the program will wait for something to happen. If it takes too long the error will be raised and we will know something prior went wrong. To fix it we need to go through the used code to find the problem.  The problem could for example be the writing channel was not onbus or in silent mode.

Where do I find information

When looking for information there are multiple ways to obtain the information needed. The first and best way to get direct information about canlib and commands used with canlib is pycanlib.readthedocs.io. If readthedocs does not work, then on Kvasers website Kvaser.com there are multiple blogs aimed at explaining canlib. To access the blogs go to Kvaser.com blogs and search for the topic of interest. On the Kvaser website we can also find more information under the support heading and in the canlib webhelp. For example we can find basic resources to get started with Kvaser hardware, documentation such as use guides, developer tools and lastly calculators for calculating bitrate available or easy use. If you do not find what you are looking for anywhere in the above then support is always available, just email your issues, problems and questions to [email protected].

For example, in the previous script we want to read a message. But we do not want to move on to the next line until the message has been properly received and read. Furthermore we also want the program to stop and return an error message if the message could not be read. To find the best way to accomplish this we need to look up the documentation at pycanlib.readthedocs.

To find the right documentation we first expand the “Using canlib” tab, since we are using canlib. Next step is how we are using it and what for. Currently we want to send a message and luckily there is a tab called “Send and Receive”, so we can expand it. Next we see that Reading Messages is also a heading so we click on it to go directly to that heading. While reading under the “read“ heading we eventually come to a list of functions. One of these states the following: “If you want to wait until a message arrives (or a timeout occurs) and then read it, call read with a timeout”. This sounds like what we are looking for. To read more about the function we can go directly to the “read” function by clicking the link labeled “read”. We can now see that “read” has a parameter called “timeout” which is an integer. This integer dictates how many milliseconds the program will wait for the message to be delivered before returning a timeout error. We have now found what we were looking for and can enter this into our code as channel.read(timeout = 500) for the program to wait 500 milliseconds.

original

Logan Via

N/A