In this small guide we will explain how the LEDs on the U100 works and how to use them.
Writer: Anton Carlsson, Software Developer
Cowriter: L-G Fredriksson, Field Application Engineer
Version: 2021-08-09A
In this small guide we will explain how the LEDs on the U100 works and how to use them.
Writer: Anton Carlsson, Software Developer
Cowriter: L-G Fredriksson, Field Application Engineer
Version: 2021-08-09A
This guide is meant for those who want to setup and use a Kvaser CAN interface with CANlib and the canlib Python package.
To be able to use this guide, you must have a Kvaser U100 interface.
Before using this guide, we recommend that you read:
If you have taken a break or just forgotten the used commands/procedure, please use this little list of powerful commands and instructions.
Deactivate the virtual environment:
deactivate
The U100 has had several changes made compared to the previous generations of Kvaser interfaces. Apart from being more robust than other devices, the most apparent change is the LEDs on the interface. Not only have the size and shape of the LEDs changed, how they work have also been changed. These changes allow the user to more easily see the LEDs as well as to receive more information about the device from the LEDs.
To start with, previous iterations of the CAN interfaces have two LEDs for the PW, and two LEDs for each available CANchannel. The U100 however only has two LED bars for the one CANchannel available on the device. One LED bar for TX and one LED bar for RX. These LEDs however have more functions and can show more than one colour.
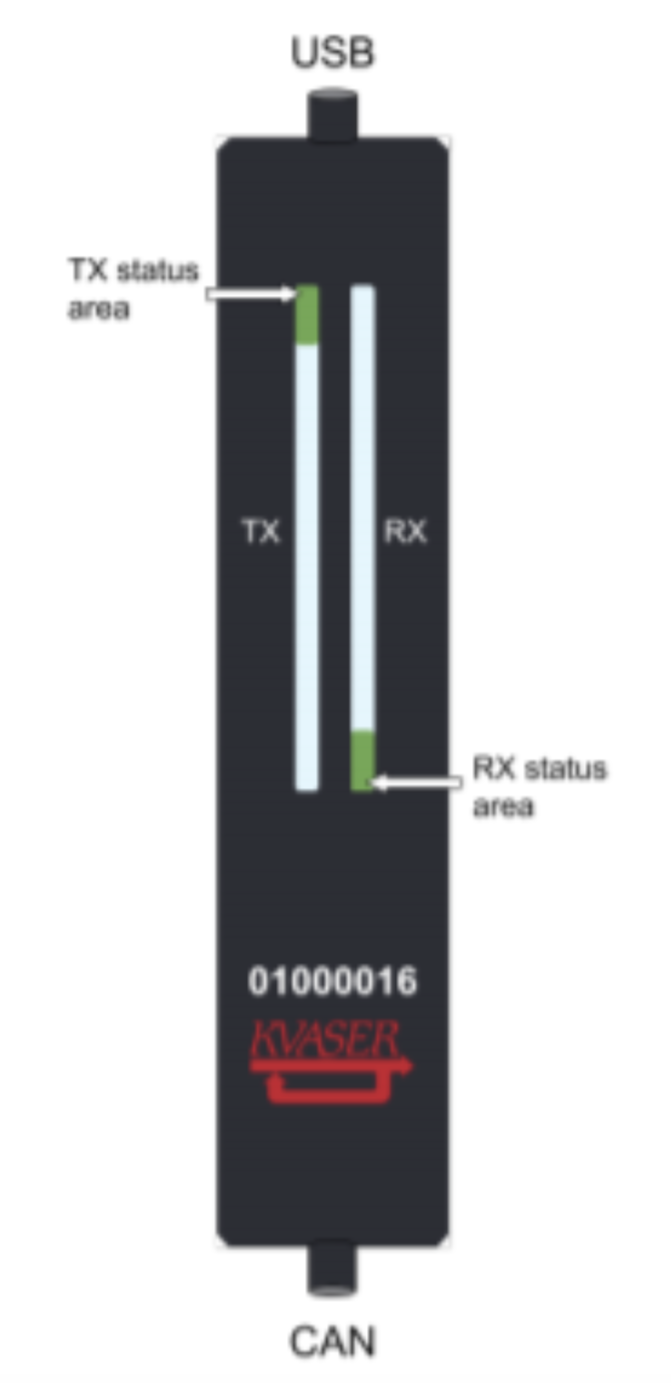
Instead of the three colours yellow, red and green the LEDs on previous devices have, the U100 has five colours. The colours being: yellow, green, red, white and blue. The LED bars have two status areas, one on each bar located according to the picture below.
When the U100 is first connected, the two LED bars will slowly flash green once before the status areas light up in white. When the channel goes on bus the white status areas will turn green. When the U100 receives or transmits a message one of the status areas will flash yellow. If it receives a message, the RX status area will flash yellow. If the device transmits a message, the TX status area will flash yellow. If we encounter errors while transceiving, the LEDs will show to a certain extent what kind of error we received. If we try to send a message with the U100 without another channel on bus, the channel will go error passive and both status areas will blink red. Additionally, because the channel is transmitting errorframes, the TX LED bar will light up red. If we try to read a message with mismatched bitrates, the status areas will still blink red. But since we are now receiving error frames the RX LED bar will light up red instead of the TX.
If we increase the bus load (increase the number of messages sent) the LEDs will reflect this. Depending on the bus load more of the LED will light up yellow starting from the status area of the TX or RX LED depending on whether we are transmitting or receiving. To test the LED we can write the following script and name it u100.py.
> .\.venv\Scripts\activate
(pyproj)> py .\u100.py
import time
from canlib import canlib, Frame

# First create two frames with different id:s.
frame_a = Frame(id_=1, data=[72, 69, 76, 76, 79, 33])
frame_b = Frame(id_=2, data=[72, 69, 76, 76, 79, 33])

# Second, open two channels, one for the U100 and one for another interface.
# In this example the U100 is connected to channel 3 and a USBcan is
# connected to channel 2. And set their bitrate.
ch_a = canlib.openChannel(channel=2, bitrate=canlib.Bitrate.BITRATE_100K)
ch_b = canlib.openChannel(channel=3, bitrate=canlib.Bitrate.BITRATE_100K)

#set both channels to normal and go on bus.
ch_a.setBusOutputControl(canlib.Driver.NORMAL)
ch_b.setBusOutputControl(canlib.Driver.NORMAL)
ch_a.busOn()
ch_b.busOn()

# To get a clearer sense of what happens, you will need to press enter between
# each test.
input("Press enter to continue")
# In the first example we will transmit messages with the U100. In the
# second example we will receive messages with the U100. And in the third
# and last example we will both send and receive messages with the U100.
# In all examples we will send 50 messages, you can test to increase this
# number to see its effect.
for i in range(50):
# We will make use of the try function during these tests. The program will
# try to execute the commands within the try-block (the indented region
# underneath). If the program encounters an CanGeneralError (indicated by
# the except command) the program will instead execute the commands within
# the except block. In this example the messages might be sent to quickly
# and result in a CanGeneralError which is why we will wait for 0.1 seconds
# with time.sleep if this happens.
    try:
        # This is the try-block.
        ch_b.write(frame_b)
        ch_a.read(1000)
    except canlib.exceptions.CanGeneralError:
        # This is the except block.
        time.sleep(0.1)

input("Press enter to continue")

for i in range(50):
    try:
        ch_a.write(frame_a)
        ch_b.read(1000)
    except canlib.exceptions.CanGeneralError:
        time.sleep(0.1)

input("Press enter to continue")

for i in range(50):
    try:
        ch_b.write(frame_b)
        ch_a.read(1000)
        ch_a.write(frame_a)
        ch_b.read(1000)
    except canlib.exceptions.CanGeneralError:
        time.sleep(0.1)

ch_a.close()
ch_b.close()
During these tests the LEDs for TX and RX will light up. If we increase the number of messages (the number within range) we will increase the bus load and more of the LED will light up in yellow.

Request more information before you complete the purchase.
